PV Mounting System for Tiled Roofs: Guide
PV mounting system for tiled roofs: choosing the right fixing system
A suitable PV mounting system for the tiled roof determines how quickly, safely and durably a photovoltaic array holds on a classic pitched roof. On clay and concrete tiles, two things matter most: the load must be transferred cleanly into the roof rafters, and the covering must not be damaged in the process. This guide shows installers and homeowners which components make up a tiled-roof system, how installation works and what to watch for with different tile types.
The two core components: roof hook and mounting rail
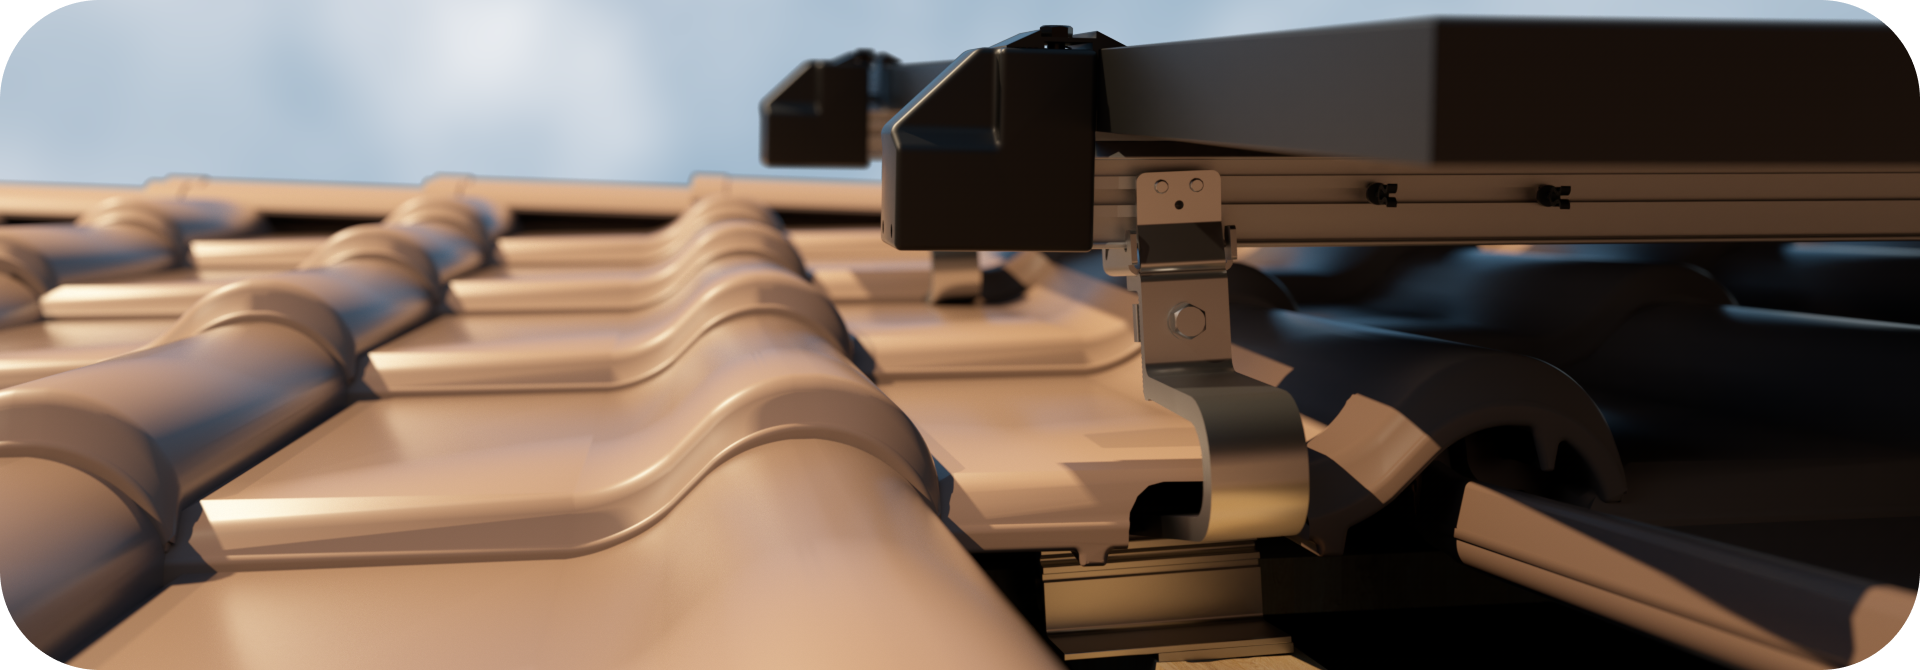
Every tiled-roof system is built around roof hooks, which are screwed into the rafters beneath the tiles, and mounting rails, on which the modules are clamped. The roof hook is the structurally most important part: it channels wind and snow loads into the load-bearing structure of the roof. The rail connects the hooks into a continuous plane and holds the module clamps.
The T1 Tiled Roof system from CLICKWERK uses a multi-position (5-way) adjustable roof hook that combines an extended and a standard version in a single part. This 2-in-1 design adapts to different tile heights without having to stock several hook types. The rotatable hook head also allows both portrait (upright) and landscape mounting without additional material.
Why the tile type matters
Clay and concrete tiles differ in shape, height and profile. A good tiled-roof system is therefore designed to be compatible with all common clay and concrete tiles and to channel loads into the rafters without damaging the tiles. The adjustable roof hook creates the clearance needed so the tile sits flat above the hook and exerts no pressure on the covering. That is exactly what prevents later leaks and cracks.
A complete system instead of single parts
A well-conceived PV mounting system for the tiled roof delivers all components matched to one another. The T1 system comprises eight mounting components:
- Roof hook – multi-position adjustable, transfers load into the rafters
- Mounting rail – made of high-quality aluminium, distortion-free
- Universal clamp – usable as mid or end clamp, fixed with a hexagon bolt
- End cap – with metal insert against distortion from solar exposure
- Rail connector – for continuous rail lengths
- Cable holder – routes the module cables tidily
- Base plate – for a clean seat of the hook
- Earthing clamp – suitable for cable cross-sections of 6–16 mm² and lightning-conductor wires of 8 mm diameter
Fewer parts mean fewer sources of error and faster installation. The universal clamp replaces separate mid and end clamps, and the aluminium rail allows a hook spacing of up to 180 cm. This reduces the number of fixing points and the amount of material – according to the manufacturer, around 30 % faster installation.
How installation works
The sequence follows a clear order: lift the tile, screw the roof hook into the rafter, replace the tile, fit the mounting rails onto the hooks and fix the modules with the universal clamp. The T1 system uses a click system (click-clack method) without elaborate screw-and-nut connections – installation succeeds with just a cordless screwdriver. This cuts installation time and error rates, especially on larger roof areas.
For correct design the rule is: every array must match its wind and snow load zone. The T1 system is developed for all wind and snow load zones; you can produce the matching structural report yourself in about three minutes with the oneClick planning software. An overview of all fixing solutions is available under mounting systems.
FAQ on the PV mounting system for tiled roofs
Does a tiled-roof system fit every roof tile?
The T1 system is compatible with all common clay and concrete tiles. The multi-position adjustable roof hook compensates for different tile heights, so the load goes into the rafters without damaging the covering. For very special profiles, a brief consultation before ordering is recommended.
Portrait or landscape – do I need different parts for that?
No. The rotatable hook head of the T1 system allows portrait and landscape mounting with the same part, without additional material. This simplifies stock-keeping and planning.
How long does delivery take?
CLICKWERK manufactures in Hamburg (Made in Germany) and ships from its Hamburg warehouse across the EU, usually within 2–4 working days. The manufacturer grants a 25-year warranty on the T1 and F1 systems.
Conclusion and next step
For a classic tiled roof, a system with an adjustable roof hook, rotatable hook head and aluminium click rail is a well-founded choice – few parts, universally usable, quick to install. The T1 Tiled Roof from CLICKWERK meets these requirements. For a complete overview of PV substructures, components and structural design, see our complete PV substructure guide.
Compare the components in the shop or have your roof checked without obligation: our team will advise you on the right configuration via the contact form.